Zeha
... ispod radara ...
- Učlanjen(a)
- 01.09.2007
- Poruke
- 12,423
- Poena
- 785
Moja oprema
- CPU & Cooler
- i5 13600K, Deepcool AG620 - CPU hladnjak
- Matična ploča
- Asus ROG MAXIMUS Z790 HERO
- RAM
- Kingston DDR5 32GB (2x16GB) Fury Renegade KF564C32RSK2-32
- GPU
- Asus TUF-RTX3070-O8G-V2-GAMING
- Storage
- Sasmung NVME 990PRO 1TB, Sasmung NVME 970EVO plus 2TB, Seagate hdd 16TB IronWolf Pro, Seagate Archive HDD 8TB
- Zvuk
- Sound Blaster Z, Sennheiser HD 599SE, Logitech X-230
- PSU
- FSP Hydro PTM PRO Platinum 1000W
- Kućište
- Fractal Design Define 7, 4x Be Quiet SILENT WINGS 4 140mm PWM high-speed
- Monitor
- Dell Alienware AW2723DF
- Miš & tastatura
- Logitech MX Master 3S, Logitech MX Keys S Graphite
- Ostale periferije
- HP LaserJet P1006
- Laptop
- Lenovo Legion 5 (82JN003EYA)
- Mobilni telefon
- Samsung Galaxy S21 Ultra
- Pametni uređaji
- LG 43UM7600PLB LED
- Pristup internetu
- Optički internet
Vidi link:
http://www.sevenforums.com/tutorials/10392-write-caching-enable-disable.html
How to Enable or Disable Write-Caching for a Storage Device in Windows 7
Information:
Write caching in a connected storage device refers to the use of high-speed volatile memory to collect write commands sent to data storage devices and cache them until the slower storage media (either physical hard disks or low cost flash memory) can accommodate them. Most devices that use write caching require that power be supplied continuously.
This will show you how to enable write caching to have better performace for a storage device, or disable write caching for quick removal of a storage device without having to use Safely Remove Hardware.
Tip Tip
If high data transfer performance is your main concern, you should enable both of these settings in OPTION TWO below:
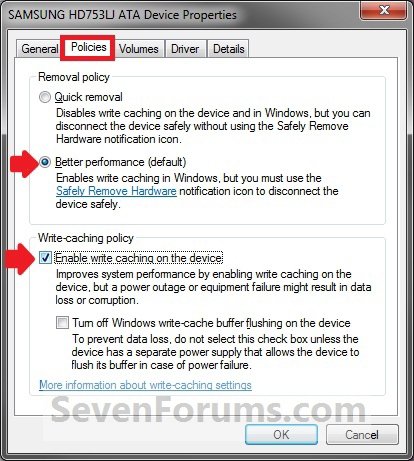
In the Removal Policy section, select the Better Performance option.
In the Write-caching policy section, select Enable write caching on the device (if the system hardware and storage device support these features).
Warning:
You must be logged into a administrator account to be able to do this tutorial.
OPTION ONE
Disable Write Caching for Quick Removal
Note:
This option is usually the best choice for storage devices that you are likely to remove from the system frequently, such as USB flash drives, SD, MMC, Compact Flash, or similar memory cards, and other similar externally attached storage devices.
When you select the Quick Removal option, Windows 7 manages commands sent to the device using a method called write-through caching. In write-through caching, the device operates on write commands as if there were no cache. The cache may still provide a small performance benefit, but the emphasis is on treating the data as safely as possible by getting the commands to the storage device. The main benefit is that you can remove the storage device from the system quickly without risking data loss. For example, if a flash drive were to be accidentally pulled out of its port, the data being written to it is much less likely to be lost.
1. Open the Control Panel (icons view), and click on the Device Manager icon.
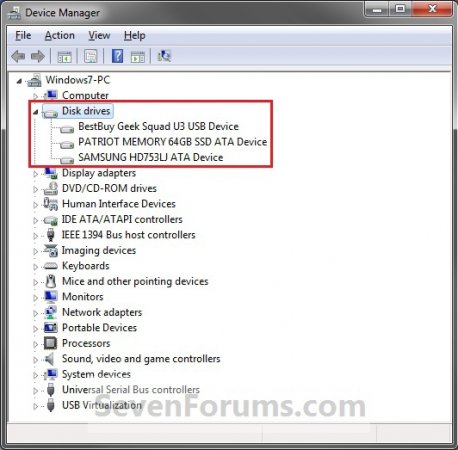
2. In Device Manger, double click on Disk drives to expand it, then double click on the listed storage device that you want to disable write caching for. (slika 1)
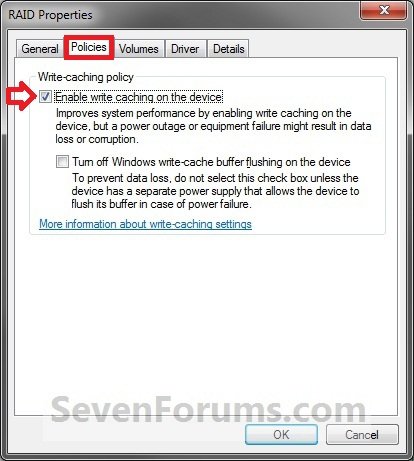
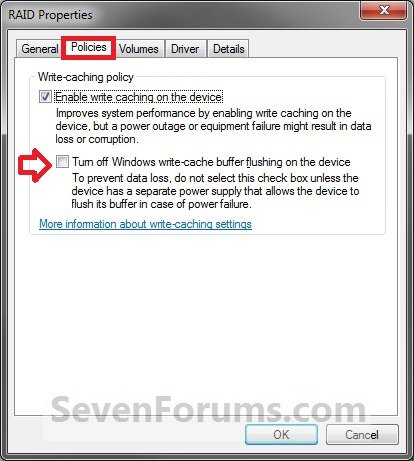
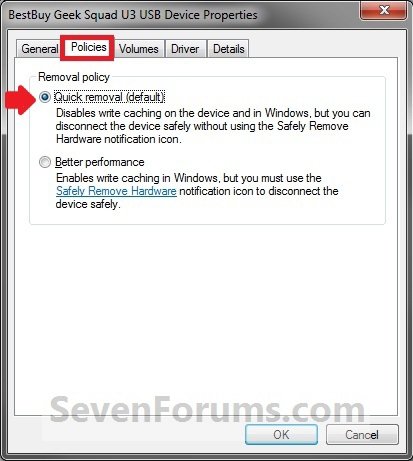
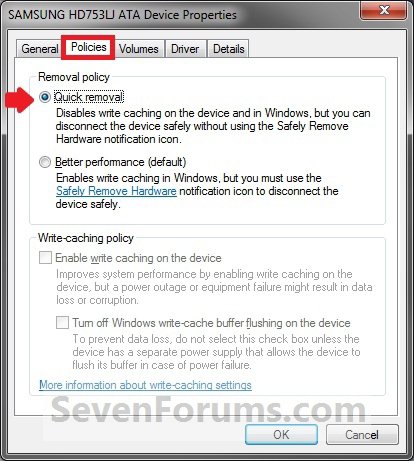
3. Click on the Polices tab. Under the upper Removal policy section, select (dot) Quick removal, or check the Turn off Windows write-cache buffer flushing on the device box, and click on OK. (slike 2-4)
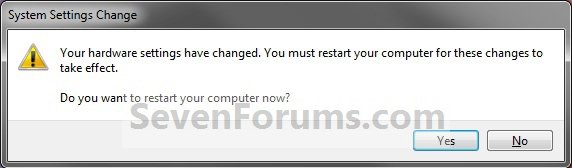
4. Click on Yes to restart the computer to apply. (slika 5)
WARNING: This will restart the computer immediately. You should save and close anything else that you are working on first.
http://www.sevenforums.com/tutorials/10392-write-caching-enable-disable.html
How to Enable or Disable Write-Caching for a Storage Device in Windows 7
Information:
Write caching in a connected storage device refers to the use of high-speed volatile memory to collect write commands sent to data storage devices and cache them until the slower storage media (either physical hard disks or low cost flash memory) can accommodate them. Most devices that use write caching require that power be supplied continuously.
This will show you how to enable write caching to have better performace for a storage device, or disable write caching for quick removal of a storage device without having to use Safely Remove Hardware.
Tip Tip
If high data transfer performance is your main concern, you should enable both of these settings in OPTION TWO below:
In the Removal Policy section, select the Better Performance option.
In the Write-caching policy section, select Enable write caching on the device (if the system hardware and storage device support these features).
Warning:
You must be logged into a administrator account to be able to do this tutorial.
OPTION ONE
Disable Write Caching for Quick Removal
Note:
This option is usually the best choice for storage devices that you are likely to remove from the system frequently, such as USB flash drives, SD, MMC, Compact Flash, or similar memory cards, and other similar externally attached storage devices.
When you select the Quick Removal option, Windows 7 manages commands sent to the device using a method called write-through caching. In write-through caching, the device operates on write commands as if there were no cache. The cache may still provide a small performance benefit, but the emphasis is on treating the data as safely as possible by getting the commands to the storage device. The main benefit is that you can remove the storage device from the system quickly without risking data loss. For example, if a flash drive were to be accidentally pulled out of its port, the data being written to it is much less likely to be lost.
1. Open the Control Panel (icons view), and click on the Device Manager icon.
2. In Device Manger, double click on Disk drives to expand it, then double click on the listed storage device that you want to disable write caching for. (slika 1)
3. Click on the Polices tab. Under the upper Removal policy section, select (dot) Quick removal, or check the Turn off Windows write-cache buffer flushing on the device box, and click on OK. (slike 2-4)
4. Click on Yes to restart the computer to apply. (slika 5)
WARNING: This will restart the computer immediately. You should save and close anything else that you are working on first.
Prilozi
Poslednja izmena: