
Koristite zastareli preglednik. Možda se neće pravilno prikazivati ova ili druge veb stranice.
Trebalo bi da nadogradite ili koristite alternativni preglednik.
Trebalo bi da nadogradite ili koristite alternativni preglednik.
Kako da ripujem Audio CD iz Winamp-a?
- Začetnik teme Swiper
- Datum pokretanja

imash onaj disk writer plugin, ali ja to ne bih koristio, poshto nisam siguran da li winamp chita audio diskove digitalno ili vrshi sviranje direktno preko zvuchne... ako je ovo drugo, imacesh neshto shto se zove analog ripping, a shto je daleko od dobrog...

Agilni
Čuven
- Učlanjen(a)
- 12.12.2003
- Poruke
- 2,103
- Poena
- 680
Da bi dobio nazive pesama nije cak ni potrebno da imas original... ah, zeznuo sam se, moras imati original 🙂
Kada ubacis cd, klikni na bilo koju pesmu sa cd-a u Winampu desnim klikom i izaberi file info, pa onda klikni na CDDB i uskoro ces dobiti nazive pesama, ime grupe i albuma (naravno, moras biti nakacen na net).
Da bi ih ripovao, moras uci u preferences/input i konfigurisati NullsoftCD/LineIn Plug-in, tako da ti bude chekirano "Enable digital audio..."
Posle toga idi u preferences/output, pa klikni na "Nullsoft disk writer plug-in, klikni na configure i odredi koji format zelis. To je to, samo pusti play na pesmi koju zelis da ripujes.
Kada sve zavrsis, ne zaboravi da output setovanja vratis na "DirectSound output".
Kada ubacis cd, klikni na bilo koju pesmu sa cd-a u Winampu desnim klikom i izaberi file info, pa onda klikni na CDDB i uskoro ces dobiti nazive pesama, ime grupe i albuma (naravno, moras biti nakacen na net).
Da bi ih ripovao, moras uci u preferences/input i konfigurisati NullsoftCD/LineIn Plug-in, tako da ti bude chekirano "Enable digital audio..."
Posle toga idi u preferences/output, pa klikni na "Nullsoft disk writer plug-in, klikni na configure i odredi koji format zelis. To je to, samo pusti play na pesmi koju zelis da ripujes.
Kada sve zavrsis, ne zaboravi da output setovanja vratis na "DirectSound output".

cddb/freedb uopshte nije pouzdan... ja sam sklapao albume od empetrojki (gde duzhina pesama chak nije bila ista kao na originalnom albumu) i freedb je sve prepoznao... koja prevara... ni u shta ne mozhesh da se pouzdash ovih dana... :mrgreen:

grozda
Čuven
- Učlanjen(a)
- 18.12.2001
- Poruke
- 579
- Poena
- 620
Za WinAmp 5.0 i 5.01 Pro ovo moze.
Kako to radi ... da ne prevodim mislim da ses se snaci:
[code:1]
Ripping CD Tracks to Your PC
****************************
Want to have your CDs available on your computer? Winamp lets you rip
(transfer and compress digitally) your CDs to your computer hard drive.
This means you can listen to them without having to pop in the CD. It
also means you can create your own playlists using individual tracks
from different albums.
Note: Before ripping tracks to your computer, you should first configure
the CD ripping settings. For more information, see General Preferences:
CD Ripping.
To rip CD tracks to your computer hard drive
============================================
1. Insert a CD that has tracks you want to transfer to your computer
hard drive.
2. Open the View menu in the Winamp main window and click Library.
3. On the right side of the Media Library, click on your CD drive within
the Devices list. You may have to doubleclick Devices to see your
list of devices. A numbered list of tracks appear in the track list.
4. If you want to rip some of the tracks on your CD, select the tracks
you want to rip in the track list. You can keep Ctrl pressed down to
select more than one track.
5. Open the Rip menu and click one of the following:
* Rip selected tracks: Click this to rip the tracks currently
selected in the track list.
* Rip all tracks: Click this to rip all of the tracks on your CD,
regardless of the currently selected tracks.
The status window appears to show you track ripping progress and
speed.
To burn tracks to a CD
**********************
1. Insert a blank CD-R or CD-RW into your computer's CD Recorder.
2. Open the View menu in the Winamp main window and select Library (or
press ALT+L) to launch the Media Library.
3. On the left pane of the Media Library, select your CD recorder within
the Devices list. CD Recorders will be identified as
CD-R <Drive Letter> (e.g. CD-R E🙂.
Note: You may have to doubleclick Devices to see your list of devices.
4. You can queue tracks to burn in the following ways:
- Add menu in Burn view: Open the Add menu and click one of the
following:
* Files: Click this to add one or more files. You can keep CTRL
pressed down to select more than one file.
* Folder: Click this to add all the files in a folder.
* Current Playlist: Click this to add the tracks in your current
playlist.
Note: As you add tracks to burn, the used and available time is
displayed above the list. Make sure you do not exceed your blank
disc's capacity.
- Drag and Drop
* Select a file or group of files (press CTRL or Shift to select
individual or group of files when clicking on desired items) from
the Local Media views
* While pressing the left mouse button, drag and drop the selected
files onto your CD recorder device
- Burning Playlists
* Using the Playlist view of the Media Library, create a new
playlist or import an existing playlist.
* Switch to that playlist by clicking it in the left pane of the
Media Library.
* Click the Burn button located within the Playlist view.
Note: This action will queue all the playlist items into the CD
Recorder view. The Media Library should automatically switch you to
the Recorder view.
5. Click Burn when you are done adding tracks to the list. The final
dialog box for burning appears.
6. Choose from the following options:
* Burn speed: Use the drop-down list to select the speed at which you
want to burn your tracks. If you have Winamp Pro, you can select
the maximum speed that your CD recorder allows.
* Enable burn-proof mode: Select this to help ensure that CD burning
doesn't fail.
* Test mode: Select this to do a test burn that doesn't actually
affect the CD.
7. Click Burn to start burning your tracks to CD.
Enjoy [/code:1]
Sve kopije originala (CD-i koji su kopirani a ne snimani iz MP3) trebalo bi da rade na CDDB
Kako to radi ... da ne prevodim mislim da ses se snaci:
[code:1]
Ripping CD Tracks to Your PC
****************************
Want to have your CDs available on your computer? Winamp lets you rip
(transfer and compress digitally) your CDs to your computer hard drive.
This means you can listen to them without having to pop in the CD. It
also means you can create your own playlists using individual tracks
from different albums.
Note: Before ripping tracks to your computer, you should first configure
the CD ripping settings. For more information, see General Preferences:
CD Ripping.
To rip CD tracks to your computer hard drive
============================================
1. Insert a CD that has tracks you want to transfer to your computer
hard drive.
2. Open the View menu in the Winamp main window and click Library.
3. On the right side of the Media Library, click on your CD drive within
the Devices list. You may have to doubleclick Devices to see your
list of devices. A numbered list of tracks appear in the track list.
4. If you want to rip some of the tracks on your CD, select the tracks
you want to rip in the track list. You can keep Ctrl pressed down to
select more than one track.
5. Open the Rip menu and click one of the following:
* Rip selected tracks: Click this to rip the tracks currently
selected in the track list.
* Rip all tracks: Click this to rip all of the tracks on your CD,
regardless of the currently selected tracks.
The status window appears to show you track ripping progress and
speed.
To burn tracks to a CD
**********************
1. Insert a blank CD-R or CD-RW into your computer's CD Recorder.
2. Open the View menu in the Winamp main window and select Library (or
press ALT+L) to launch the Media Library.
3. On the left pane of the Media Library, select your CD recorder within
the Devices list. CD Recorders will be identified as
CD-R <Drive Letter> (e.g. CD-R E🙂.
Note: You may have to doubleclick Devices to see your list of devices.
4. You can queue tracks to burn in the following ways:
- Add menu in Burn view: Open the Add menu and click one of the
following:
* Files: Click this to add one or more files. You can keep CTRL
pressed down to select more than one file.
* Folder: Click this to add all the files in a folder.
* Current Playlist: Click this to add the tracks in your current
playlist.
Note: As you add tracks to burn, the used and available time is
displayed above the list. Make sure you do not exceed your blank
disc's capacity.
- Drag and Drop
* Select a file or group of files (press CTRL or Shift to select
individual or group of files when clicking on desired items) from
the Local Media views
* While pressing the left mouse button, drag and drop the selected
files onto your CD recorder device
- Burning Playlists
* Using the Playlist view of the Media Library, create a new
playlist or import an existing playlist.
* Switch to that playlist by clicking it in the left pane of the
Media Library.
* Click the Burn button located within the Playlist view.
Note: This action will queue all the playlist items into the CD
Recorder view. The Media Library should automatically switch you to
the Recorder view.
5. Click Burn when you are done adding tracks to the list. The final
dialog box for burning appears.
6. Choose from the following options:
* Burn speed: Use the drop-down list to select the speed at which you
want to burn your tracks. If you have Winamp Pro, you can select
the maximum speed that your CD recorder allows.
* Enable burn-proof mode: Select this to help ensure that CD burning
doesn't fail.
* Test mode: Select this to do a test burn that doesn't actually
affect the CD.
7. Click Burn to start burning your tracks to CD.
Enjoy [/code:1]
Sve kopije originala (CD-i koji su kopirani a ne snimani iz MP3) trebalo bi da rade na CDDB
Instalacija aplikacije
How to install the app on iOS
Follow along with the video below to see how to install our site as a web app on your home screen.
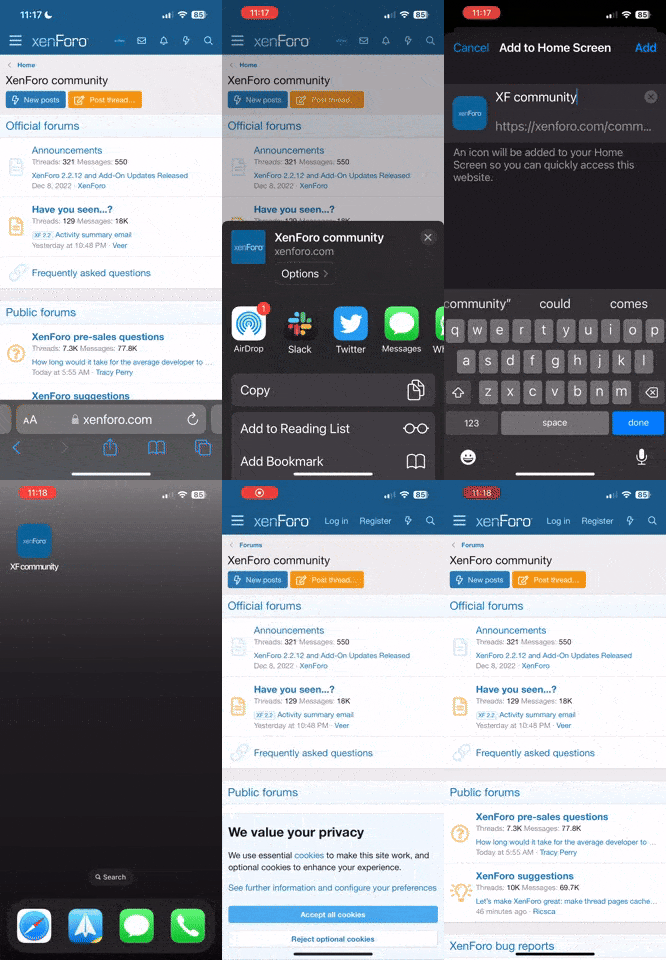
Napomena: this_feature_currently_requires_accessing_site_using_safari