Šta je novo?

AHCI ukljuciti / iskljuciti ( on ili off ) nakon instalacije W7

Zeha

... ispod radara ...
Učlanjen(a)
01.09.2007
Poruke
12,331
Poena
785
Moja oprema  
CPU & Cooler
i5 13600K, Deepcool AG620 - CPU hladnjak
Matična ploča
Asus ROG MAXIMUS Z790 HERO
RAM
Kingston DDR5 32GB (2x16GB) Fury Renegade KF564C32RSK2-32
GPU
Asus TUF-RTX3070-O8G-V2-GAMING
Storage
Sasmung NVME 990PRO 1TB, Sasmung NVME 970EVO plus 2TB, Seagate hdd 16TB IronWolf Pro, Seagate Archive HDD 8TB
Zvuk
Sound Blaster Z, Sennheiser HD 599SE, Logitech X-230
PSU
FSP Hydro PTM PRO Platinum 1000W
Kućište
Fractal Design Define 7, 4x Be Quiet SILENT WINGS 4 140mm PWM high-speed
Monitor
Dell Alienware AW2723DF
Miš & tastatura
Logitech MX Master, Logitech Illumimated K800
Ostale periferije
HP LaserJet P1006
Laptop
Lenovo Legion 5 (82JN003EYA)
Mobilni telefon
Samsung Galaxy S21 Ultra
Pametni uređaji
LG 43UM7600PLB LED
Pristup internetu
  1. Optički internet
Vidi link:

http://forums.guru3d.com/showthread.php?t=313676

A little guide:

I am receiving a lot of emails from users who bought a SSD drive, installed Windows 7 in IDE mode and then realize they need AHCI mode for faster SSD performance. Once you enable that in the BIOS during Windows 7 boot up, the OS will crash.

The common question is, is there a solve for this ?

To answer that question (and I do this safely with all Intel ICHR9/10 chipsets) there is a way to safely enable AHCI mode. Here we go:
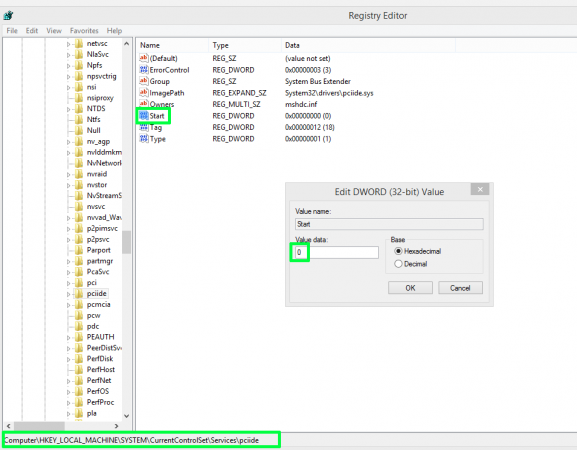
1. Startup "Regedit
2. Open HKEY_LOCAL_MACHINE / SYSTEM / CurrentControlset / Services
3. Open msahci
4. In the right field left click on "start" and go to Modify
5. In the value Data field enter "0" and click "ok"
6. exit "Regedit"
7. Reboot Rig and enter BIOS (hold "Delete" key while Booting

In your BIOS select "Integrated Peripherals" and OnChip PATA/SATA Devices. Now change SATA Mode to AHCI from IDE.

You now boot into windows 7, the OS will recognize AHCI and install the devices. Now the system needs one more reboot and voilla .. enjoy the improved SSD performance.

We have not tested this on Vista though.
 
Poslednja izmena:
Svaka cast na trudu i strpljenju;)
 
hm... kako to da uradim u win8, nisam nasao msahci servis u redzistriju

edit: nasao, zove se drugacije, storeachi, ali je vrednost vec 0, postoji startoverride vrednost u storeachi koju kazu da treba staviti na 0, takodje nista - fejl prilikom butovanja.
 
Poslednja izmena:
na zalost ni jedno od resenja ne radi kod mene.
 
ovo : http://forums.pcper.com/showthread.php?444831-HOWTO-enable-AHCI-mode-after-installing-Windows

ili ti prekopirano

HOWTO: enable AHCI mode after installing Windows

Not sure if this has been posted before, but I managed to successfully enable AHCI mode after installing Windows. Here's how...

AHCI (Advanced Host Controller Interface) is present on newer Intel chipsets such as 975X (ICH7), P965 (ICH8), and P35 (ICH9). AHCI mode is enabled in the BIOS and 3 settings are commonly available: IDE, AHCI, and RAID. The last two (AHCI and RAID) require a driver floppy and the F6 method when installing Windows XP otherwise the hard disks won't be detected.

AHCI mode brings 3 main advantages:

Supports NCQ (Native Command Queuing) allowing SATA drives to accept more than one command at a time and dynamically reorder the commands for maximum efficiency.
Supports hot plugging of devices
Supports staggered spin ups of multiple hard drives at boot time


However, in the real world the performance difference isn't huge.

The problem is that if you installed Windows in IDE mode (ie you didn't use F6 and supply a driver disk), then simply changing the BIOS setting to AHCI mode and rebooting will cause Windows to fail and will require a repair install. Most people have been advising to reinstall Windows if you want AHCI enabled.

I managed to enable AHCI on Windows XP Professional for a Gigabyte P35-DS4 (ICH9R) without needing to reinstall. This should work on any P35 ICH9 based board:

1. Go to Intel's download centre and download the latest version of the Intel Matrix Storage Manager (7.6.0.1011, 8/2/2007 at time of writing) for your OS:

http://downloadcenter.intel.com/Prod...=2101&lang=eng

Keep this file as you'll need it again in step 4.

2. Run the installer with the -a switch to extract the files. This will NOT install the software, just extract the files. Follow the prompts as if you were installing the software:

Code:

iata76_enu.exe -a

The above should extract the files to \Program Files\Intel\Intel Matrix Storage Manager. There are two folders, \Drivers and \Drivers64 for 32-bit and 64-bit OS's, respectively.

Copy the file IaStor.sys from the Drivers folder to C:\Windows\System32\drivers\

3. copy the following registry file to your desktop (copy and paste into notepad) and save as ahci.reg

Code:

Windows Registry Editor Version 5.00

[HKEY_LOCAL_MACHINE\SYSTEM\ControlSet001\Control\CriticalDeviceDatabase\pci#ven_8086&dev_2922&cc_0106]
"Service"="iaStor"
"ClassGUID"="{4D36E96A-E325-11CE-BFC1-08002BE10318}"

[HKEY_LOCAL_MACHINE\SYSTEM\CurrentControlSet\Services\iaStor]
"Type"=dword:00000001
"Start"=dword:00000000
"Group"="SCSI miniport"
"ErrorControl"=dword:00000001
"ImagePath"="system32\\drivers\\iaStor.sys"
"tag"=dword:00000019
"DisplayName"="Intel AHCI Controller"

[HKEY_LOCAL_MACHINE\SYSTEM\CurrentControlSet\Services\iaStor\Parameters]
"queuePriorityEnable"=dword:00000000

[HKEY_LOCAL_MACHINE\SYSTEM\CurrentControlSet\Services\iaStor\Enum]
"0"="PCI\\VEN_8086&DEV_2922&SUBSYS_B0051458&REV_02\\3&13c0b0c5&0&FA"
"Count"=dword:00000001
"NextInstance"=dword:00000001

4. Double check you've copied the IaStor.sys file as part of step 2. Now do the following:

Run the ahci.reg file to add the entries into the registry
Reboot the computer and enter the BIOS - DO NOT allow it to start Windows yet.
Change the setting for the on board Intel controller to AHCI, save and exit BIOS
Boot into Windows


When Windows loads it will detect a new hard disk - cancel the wizard for installing the new hardware and run the Intel driver installer you downloaded in step 1.

Reboot the system again and you're good to go

Now, under Device Manager > IDE ATA/ATAPI controllers you should see Intel(R) ICH9 SATA AHCI Controller listed.

Hope someone finds this useful - I wanted to do this as I needed AHCI mode to dual boot Linux and I didn't have a floppy drive on the machine to allow me to install Windows XP in AHCI mode. This is one area Vista has moved forward - it will allow you to install drivers from devices other than A: such as a USB pendrive or CD.

If you want to enable write caching, see einshem's tip here:

http://forums.pcper.com/showthread.p...5&postcount=23

Quote Originally Posted by einshem
2. All this process worth nothing if you forget at the end to go to device manager, double klick your hard-drive(s) under "disk drivers", go to "policies" tab and mark "Enable write caching for this disk" (I recommend adding this to the guide)
EDIT: Here is a Registry file that should work for 975X and P965 based boards:

Code:

Windows Registry Editor Version 5.00

[HKEY_LOCAL_MACHINE\SYSTEM\ControlSet001\Control\CriticalDeviceDatabase\pci#ven_8086&dev_2821&cc_0106]
"Service"="iaStor"
"ClassGUID"="{4D36E96A-E325-11CE-BFC1-08002BE10318}"

[HKEY_LOCAL_MACHINE\SYSTEM\CurrentControlSet\Services\iaStor]
"Type"=dword:00000001
"Start"=dword:00000000
"Group"="SCSI miniport"
"ErrorControl"=dword:00000001
"ImagePath"="system32\\drivers\\iaStor.sys"
"tag"=dword:00000019
"DisplayName"="Intel AHCI Controller"

[HKEY_LOCAL_MACHINE\SYSTEM\CurrentControlSet\Services\iaStor\Parameters]
"queuePriorityEnable"=dword:00000000

[HKEY_LOCAL_MACHINE\SYSTEM\CurrentControlSet\Services\iaStor\Enum]
"0"="PCI\\VEN_8086&DEV_2821&SUBSYS_B0051458&REV_02\\3&13c0b0c5&0&FA"
"Count"=dword:00000001
"NextInstance"=dword:00000001
 
i još...

How to enable AHCI in Windows 7 after Instalation:

There is one way to fix this, although you need to have knowledge of registry editing. The detailed steps from Microsoft are as follows:

1.Exit all Windows-based programs.
2.Click Start, type regedit in the Start Search box, and then press ENTER.
3.If you receive the User Account Control dialog box, click Continue.
4.Locate and then click the following registry subkey:
HKEY_LOCAL_MACHINESystemCurrentControlSetServicesMsahci
5.In the right pane, right-click Start in the Name column, and then click Modify.
6.In the Value data box, type 0, and then click OK.
7.On the File menu, click Exit to close Registry Editor.

After this you’ll have to restart your computer, go to BIOS and enable AHCI. When you log in to Windows again, you’ll notice the installation of drivers for AHCI. Another restart will be required to finish the driver installation.
 
Ma ne treba video tutorijal samo se slede stavke dva posta iznad i resen problem...
Sinoc odradio... bukvalno za manje od 5min... sve radi ko sat... bolji rezultat u testovima za SSD PX-256M

Hvala...
 
Evo jos jedno objasnjenje od kolege @marxista

Znači ovako:

1) Run the Registry Editor (regedit.exe)
2) Navigate to Registry Key: HKEY_LOCAL_MACHINE\System\CurrentControlSet\Servic es\Msahci
3) Set the "Start" value to 0 (zero)
4) Navigate to Registry Key: HKEY_LOCAL_MACHINE\System\CurrentControlSet\Servic es\Pciide
5) Set the "Start" value to 0 (zero)
6) Shut down
7) Start up again, but before Windows boots go into the BIOS configuration screens and change the disk mode to "AHCI". Save the new BIOS configuration and restart so that Windows boots.
 

Prilozi

  • 2014-08-26-170803-sa-hdd.png
    2014-08-26-170803-sa-hdd.png
    62.3 KB · Pregleda: 130
Nazad
Vrh Dno